August 16, 2010

Mouth-Watering Stuffed Mushrooms


Raise your hand if you love mushrooms as much as I do.

Now, put your hand down.

Because NO ONE loves muchrooms as much as I do.

You may think you do...

But, you are wrong.

Sorry

Forgive Sarah, she just got a macro lens...and can not be trusted with it.
But, you must admit, the pictures are pretty amazing.
Even though she sent me 500 that look just like this one.


I made this recipe before Sarah, and tweaked it around a bit and then she made it, and tweaked it around a bit more. And now I think we have it down perfect.

Perfect I tell you!


The flavor and texture of the cream cheese with the garlic and mushroom stems work so well with the paprika and Parmesan cheese. For a bit of crunch I switched out half an onion for the onion powder in the recipe and Sarah ended up adding breadcrumbs to the top. Also, the Recipe called for cayenne pepper but we used paprika and coriander, a match made in heaven


You'll need a lot of mushrooms.
Just when you think you have washed, de-stemmed, and taken pictures of enough...make more.
and then more.
and more.
Okay, not that much,
But alot.
Precisely, about 24. Or maybe 30 if youre like me and end up eating a whole bowl of these and decide that sharing is NOT acceptable.

Chop half of the stems extremely fine...(yes, extremely or you will end up with a lumpy filling. Good in theory, but not so good in reality), discard of the rest.

Heat oil in a large skillet over medium heat. Add garlic and chopped mushroom stems to the skillet. Fry until any moisture has disappeared, taking care not to burn the garlic (If you do burn the garlic, feel free to comment here and tell me, it will make me feel better about burning my garlic.

Set aside to cool.

When garlic and mushroom mixture is no longer hot (or, if you are impatient like me, still pretty hot, just no longer piping hot), stir in cream cheese, Parmesan cheese, black pepper, Onion, paprika, and coriander. Mixture should be very thick. Using a little spoon, fill each mushroom cap with a generous amount of stuffing...by generous I mean fill till it is overflowing....


...then add even more on top of that.


Arrange the mushroom caps on prepared cookie sheet, top with breadcrumbs.
Bake for about 30 minutes at 350, or until the tops are browned.


Attempt to wait till they are no longer hot, then pop one into your mouth and enjoy...
...then spend the rest of the day with a tingly tongue, wishing you had waited till they were no longer hot to eat.
Enjoy.
Official Ingredients List and Directions

24 whole fresh mushrooms

1 tablespoon vegetable oil

1 tablespoon minced garlic

1 (8 ounce) package cream cheese, softened

1/4 cup grated Parmesan cheese

1/2 onion,diced

1/4 tsp paprika

1/4 tsp coriander

breadcrumbs

Preheat oven to 350 degrees F (175 degrees C).

Spray a baking sheet with cooking spray. Clean mushrooms with a damp paper towel. Carefully break off stems. Chop stems extremely fine, discarding tough end of stems.

Heat oil in a large skillet over medium heat. Add garlic and chopped mushroom stems to the skillet. Fry until any moisture has disappeared, taking care not to burn garlic. Set aside to cool.

When garlic and mushroom mixture is no longer hot, stir in rest of ingredients. Mixture should be very thick.

Using a little spoon, fill each mushroom cap with a generous amount of stuffing. Arrange the mushroom caps on prepared cookie sheet. Bake for 25-30 minutes in the preheated oven, or until the mushrooms are piping hot and liquid starts to form under caps.


July 31, 2010

Fried German Dumplings

Not everybody likes German dumplings, I usually hear it's the texture that throws them off. But for the ones of us that do like them, we looove them. We grew up on german dumplings, being as our mother is german. Every year when we visit Germany we make sure to bring back 10+ boxes of the dumpling mix. Which is why I wasn't sure if I wanted to put this recipe up to begin with, why put up a recipe with an ingredient most people might not be able to find? But Sarah said that she did see the mix in a store here in the states so I decided to put it up. If you can't find it in your local store, look for a European store near you, they will most likely have it.

It was sarah's idea to make these stuffed and fried. We have made fried dumpling before, but usually it the next day you take leftover dumplings and you slice them up and fry them for breakfast. But this time we added chives and cheese (a good combo in any meal) and then fried them, and they were so delicous!

Fried German Dumplings

1 Box Knodel (Pre-made German dumpling mix)
3 cups water
2-3 tbsp chives
1 tbsp garlic pepper
Parmesan cheese
Oil, for frying


In a large bowl, stir together dry Knodel mix, chives, and garlic pepper. Next, stir in 3 cups of water. Wait for dough to thicken- about 5-10 minutes. Roll into 3 inch balls. Cook according to directions (usually, boil about 20 minutes).

Strain water from dumplings, and push parm. cheese through to the center of each dumpling (easier with wet hands).

Roll dumplings with bread crumbs.


Fry in a medium frying pan, until golden brown. Let cool, and eat!

July 26, 2010

The Everything-Wonderful Fudgy Brownie.


First of all, let me just tell you that these are the best freakin' brownies I have ever had.
With that said, if you like a more traditional, fluffy brownie, you might want to try recipe we got this from: http://www.scharffenberger.com.

But if you're like me, and like the gooey, warm, fudgy stuff, you have GOT to try this.

We weren't trying to divert from the original recipe (and we really didn't that much.), but halfway through when we realized we had no baking powder, we knew we weren't going to get quite the same result.

The Everything-Wonderful Fudgy Brownie
4 ounces unsweetened chocolate (we used 2 ounces cocoa powder, and 2 ounces bakers chocolate, plus 2 tbsp oil)
2/3 cup butter (about 10 1/2 tbsp)
2 cups sugar
4 eggs
2 teaspoons vanilla extract
1 1/2 cups flour (but we used 1 2/3 b/c of high altitude)
1/2 teaspoon salt


Preheat oven to 350 F.

Melt chocolate and butter over low heat.

Remove from heat and mix in sugar with wooden spoon. Crack eggs into pot, add vanilla, and mix (dirtying a whisk is optional).

Gently lay the flour and salt on top of the gooey chocolate mixture. Gently mix in the flour and salt with a fork without digging into the chocolate (this is important!).
Grab your wooden spoon and stir everything together (still gently) just until all flour is incorporated. Do not over beat.


Pour into greased 9" x 12" (or 8" x 12") pan. Bake for 25 minutes (check at 20). Brownies are done when toothpick comes out pretty clean. Cool for 10 minutes in pan, then cut into squares.


Just wanted to say

Thank you for the comments, we appreciate it!


-Smirks :).

Franks Red Hot Stir Fry

I make this stir-fry alot at home. No, not because it is simple. No, not because it is cheap. No, not because all the ingredients work so well together that it leaves you amazed and wanting more.
But because of the Franks Red Hot Hot Sauce.
Buy me a gallon of Franks and I will love you forever.
In fact, my mother did just that.
Hence why I love her so much.
Of course, even though the hot sauce is best part of the whole recipe, there are plenty of other reasons why this recipe is so good. So it was still good, even when I had to make a batch minus the hot sauce for Sarah.
She is my sister. I love her. Even though she does not like hot sauce.
Whew. That was hard.


But, I've moved on. Once you have too, chop up 1 onion, three bell peppers (colors of your liking), and 1 tomato (seeded and diced).
Heat oil in pan over medium heat and add onions, peppers, and butter (2 Tbsp) . Let simmer till onions are translucent.
While this is cooking up and your kitchen is filling with the amazing scent of cooking peppers and onions, pull yourself out of the trance, and cook rice according to package instructions (about 1/2 cup per person.)

So yummy.

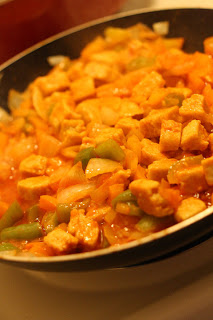
This is what it will look like pre-hot sauce. Notice the vegetarian chicken thrown in. Of course for the meat eaters, feel free to use real chicken. If you absolutely need to. Which you don't.
Trust me.
Then pour over the hot sauce. Now, you are wondering, well how much hot sauce do I use?
I would tell you.
If I could.
But I'm afraid I get so lost in the hot sauce step, I forget to measure.
If I had to guess, I would say 1/2 cup.
But, the average person might want a lil less than that.
I like to smother the onions and peppers in a Franks Red Hot bath.
They appreciate it.

After adding the chicken and hot sauce over the top of the peppers and onions, stir and cover, reducing heat and stirring occasionally.

*if you are not a sane person and do not want to use hot sauce, cook the same way without adding the Hot Sauce, keep on medium and covered till onions are translucent then remove from heat.

When The hot sauce has reduced down slightly, remove from heat. Serve over rice.

And if you are making a double batch because you too are crazy, you will end up with these two plates of amazing food
(the one with hot sauce of course, slightly more amazing...just kidding...no I'm not)
If not, then you have one huge plate of this meal.
And you are sane.
Congrats.
And Enjoy.

July 24, 2010

Roasted tomato soup

I love soup. I love tomatoes. I love Peppers. I love cheese.
I love tomatoe soup topped with cheese.


Of course, you will be needing 5 tomatoes, cored (if necessary) and quartered. Also, you may use regular bell peppers, but we used 4 mini sweet peppers (We used red and yellow) And of course, 3 medium yellow onions, peeled, quartered.

Hand ingredients to someone else to chop, particulary the onions (I hate crying while chopping, its hazardous).
If you happened to hand them to someone who chops as slow as Sarah, feel free to run a marathon, buy a coffee and a snack on your way home, take a nap, and watch a few episodes of lost, as I did, while you wait.
I meant I watched lost...not ran a marathon.
I could've...but I didn't.


Preheat the oven to 375F degrees and position 2 racks in the middle of the oven. Line 2 rimmed baking sheets with parchment paper.
Arrange the tomatoes, skin side down, on a baking sheet. Give the peppers and onions an olive oil bath and put them on the other baking sheet along with the garlic, place the pepper skin side down as well. Give both sheets a light showering of salt, then bake until the tomatoes start to collapse and the onions start to brown and caramelize, about 45 minutes.
When they look as beautiful as this, and the garlic is ooey, gooey, and the cloves are slightly browned, take them out of the oven.


Peel the garlic, dump all of the roasted vegetables into a big, high-sided bowl, and puree with a hand blender. If you are cool enough to have a hand blender. Then, send the hand blender to me. Thank you.
If you are like me, use a food processor and work in batches. Blend in a cup of the stock, and keep adding the rest 1/2 cup at a time until the soup is the desired consistency. Add the paprika, chives, and sugar.
Oh, so pretty.

See the clumps? That is how we prefer it.
But, if you prefer a smoother soup, feel free to blend longer.

Transfer into a pot over low-heat to heat through. Top with cheese.


We ate with a breadstick on the side.
AKA in the soup.
A.K.A an amazing addition to this amazing dish.
Enjoy.
An Official list of ingredients. Because my scatter-brain explantion of what to do is sloppy.
But you love it
5 tomatoes, cored (if necessary) and quartered
3-4 mini sweet peppers (I used red and yellow)
3 medium yellow onions, peeled, quartered
extra-virgin olive oil
5 plump cloves of garlic, unpeeled
fine-grain sea salt
2 - 3 cups light vegetable stock or water
1 1/2 Tbs. cut chives
1 Tsp. sugar
1/4 teaspoon smoked paprika


Stuffed falafels

The other day Sarah asked me if there was anything that was made of meat that I missed eating. I said no, because anything that is made with meat I can replicate (and make it better). But one thing I haven't had since my vegetarianism is cheese filled burgers. So I wanted to make some. And since I've been crazy about falafels lately, I thought stuffed falafels would be a good experiment. And man were they delicous.


I used three types of cheese, mozzarella, pepper jack, and sharp cheddar. I would say the pepper jack was my favorite, I have a thing for spicy food. But it was all good, the cheddar worked well with the chives and tomato and of course mozzarella is always good in anything.

Pulse chickpeas, tahini, and chives in blender or food processor until mostly smooth, but still chunky. Transfer to bowl, and stir in flour, onions, and tomatoes.


Shape chickpea mixture around two pieces of diced cheese, into 1-inch-thick patties
Of course, traditional falafels are not this big.
But I am not traditional.
And this is not a traditional recipe.
It is a cheese-stuffed one.
Pour enough olive oil into large skillet to have 1/4 inch in bottom. Heat over medium-high heat. Place patties in pan, making sure patties don’t touch. Cook 2 minutes per side, or until golden brown. Transfer to paper-towel-lined platter to drain.

Eat a few plain when no one is looking, serve the rest over salad.
Enjoy
Official list of Ingredients

1 16oz can chickpeas, drained and rinsed

2 Tbs. Tahini

1-2 tomatos diced

1 onion, diced

1 Tbsp cut chives

1/3 cup flour

Diced cheeses of your choice.

Olive oil, for frying

Grilled Cheese


I know, I know. Grilled Cheese isn't exactly something to get too excited about. Well, my grilled cheese it. I could live off these sandwhiches, and occasionally I have.


Grilled Cheese
Whole wheat bread (I prefer to use honey oat)
Mayo
Butter
Cheese of your choise (I like using asiago or pepper jack)
Coriander
All-purpose seasoning
Baby Bok Choy
1 Large Tomato

Spread mayo on both sides of bread. Put about 3 pieces of bok choy leaves, a few slices of tomato and 2 slices of cheese on sandwhich. I also put a vegetarian chicken patty on mine, which is shown in the pictures.


Spread a little bit of butter on both sides of the sandwich, sprinkle coriander and seasoning over bread and lightly spread it so it stays on bread. A panini maker or frying pan would work fine, heat over medium heat and cover the pan to melt the cheese. ....And yes it is necessary to cut it into two triangles before eating.

.

July 20, 2010

Homemade Ricotta Ravioli.


I originally found this recipe from Giada here, but we ended up changing it around a bit. Half of it we used prosciutto, and half we didn't (Due to Cyndie being vegetarian). They are pretty time consuming to make, but worth it in the end!

1 container whole milk Ricotta cheese (15 ounces).
About 5 ounces spinach frozen spinach, dried and thawed.
4 ounces prosciutto, thinly chopped.
2 large egg yolks.
1 egg.
48 wonton wrappers.
1/3 cup chopped mushrooms.
2 tsp garlic pepper.
1 tbsp all-purpose seasoning.
3 tsp cut chives.

In a large bowl, mix the ricotta, spinach, prosciutto, egg yolks, mushrooms, and spices to blend.
Place 1 tbsp filling in the center of each wonton wrapper. Brush the edges of the wrappers with egg, and pinch the edges to seal into a square.


In batches, cook the ravioli in boiling, salted water for about 4 minutes each.
Strain, and let dry completely, before serving.


We used a simple Alfredo sauce to go along with it, w/ extra chives, and it went very well together- but a butter sauce would work, also.

Hershey Kiss Cookies


This is our family recipe for these delicious Hershey Kiss cookies :) I originally wasn't going to put the recipe on here, because it is a family recipe and I don't want the whole world to know it. But, Sarah told me to, since you can find recipes for it online anyways. (But trust me, ours is the best.)
Trust me.

Hershey Kiss Cookies
2 sticks of butter
1/3 cup sugar
1/3 cup brown sugar
2 cups flour
1 Tsp. vanilla
1 cup mini semi-sweet chocolate chips
1 16 oz bag of Hershey kisses

    Preheat oven to 350 degrees.

    In a large bowl combine butter, sugar, brown sugar, and vanilla.
    Mix in flour a little at a time.
    Add in 1 cup of Chocolate chips.

    Hold up all the dough in one gigantic ball and take a picture of it.
    Yes, this is a very important step in making these cookies.
    If you don't do it, the cookies will come out all wrong.
    So do it.

    Wrap cookie dough around a Hershey Kiss and place on baking sheet. Repeat with rest of dough.

    Try not to eat too many hershey kisses while doing this.

    Or, if you are cool like me, wrap one, eat one, repeat.

    Since this dough won't expand, don't worry about how far apart you place the cookies.

    They take about 10-15 minutes to bake, but it depends a lot on your oven, and how big you make them- so just check on them until they are golden brown.

    I think they are better the next day, but they rarely (never) last that long. Right when they come out the kiss is still melted and warm inside the cooked dough. Best dipped in a cold glass of milk :)